Focus Stacking
Focus stacking combines several frames, each focused at a different depth, into one image that is sharp from front to back. It is useful for objects with real depth, such as bound volumes that do not lie flat, coins, or three-dimensional artifacts, where a single frame cannot hold everything in focus at the aperture you want to use.
DT Nexus moves the lens focus of the camera through the depth you set, captures a frame at each step, and can then stack the frames into one image.
Requirements
- A Phase One iXH, connected in Capture One. Focus stacking needs a camera that DT Nexus can focus, and the iXH is the camera it supports.
- A Capture One session. The frames are written into its capture folder.
- To stack: Phase One images, at least two per stack.
Capturing a Focus Sweep
The Focus Stack Capture Control tool is in the Capture stage. Without a supported camera, its status reads "Needs a camera with lens focus control".
Focus on the nearest detail that must be sharp, then click Set Near.
Focus on the farthest detail that must be sharp, then click Set Far. Planned frames shows how many frames the sweep will take.
Optionally, type a Stack name. This names the folder for the next sweep. Leave it empty to number the folders automatically: FocusStack_0001, FocusStack_0002, and so on. Turn on Copy stack name to clipboard if you use the stack name in your Capture One file names through the Clipboard Contents token.
Optionally, choose a Focus Stack Export preset in After capture to stack each sweep as soon as it is captured. The default is Don't stack.
When the status reads "Ready · choose Focus Stack in Trigger", choose Focus Stack in the Mode menu of the Trigger tool and press Capture.
The sweep moves focus from Near to Far, one frame per step, then returns focus to Near. When it finishes, the status shows the sweep name and how many frames were captured, for example "FocusStack_0001 captured · 12 frames · back at Near". If focus did not return to Near, the status says so.
To end a sweep early, click Stop. The frames already taken are kept in the sweep folder but are not stacked.
If you change the lens, the status reads "Lens changed: set Near and Far again". To start over at any time, choose Clear Near and Far from the ⋮ menu.
Focus Stack Settings
Choose Focus Stack Settings… from the ⋮ menu to control how DT Nexus plans the frames.
Setting | Range | Default | What it does |
|---|---|---|---|
Circle of confusion | 1 to 100 µm | 2 × the sensor's pixel pitch | The largest blur still counted as sharp. A smaller value gives more frames. |
Overlap | 0 to 90 % | 30 % | How much the sharp zone of each frame overlaps the next. A higher value gives more frames. |
Focal length | 10 to 1000 mm | Reported by the camera | Shown only when the camera does not report the focal length. |
Click Default to return the circle of confusion to its default. The dialog shows the result, for example the number of frames and the size of each focus step. If the chosen aperture is small enough that diffraction limits sharpness, the dialog tells you.
If the status reads "Focal length unknown: set it in Focus Stack Settings (⋮)", enter the focal length of your lens in this dialog.
The ☰ menu saves and loads Focus Stack Capture presets.
Where the Frames Go
Each sweep is saved in its own folder inside the capture folder of the Capture One session, named with the stack name or FocusStack_0001, FocusStack_0002, and so on. A small focus_stack.json file in the same folder records the frame order, and DT Nexus uses it when stacking. Leave it with the frames.
Stacking a Sweep
Stacking is done in the Focus Stack Export tool in the Export stage, or automatically after each sweep if you chose a preset in After capture.
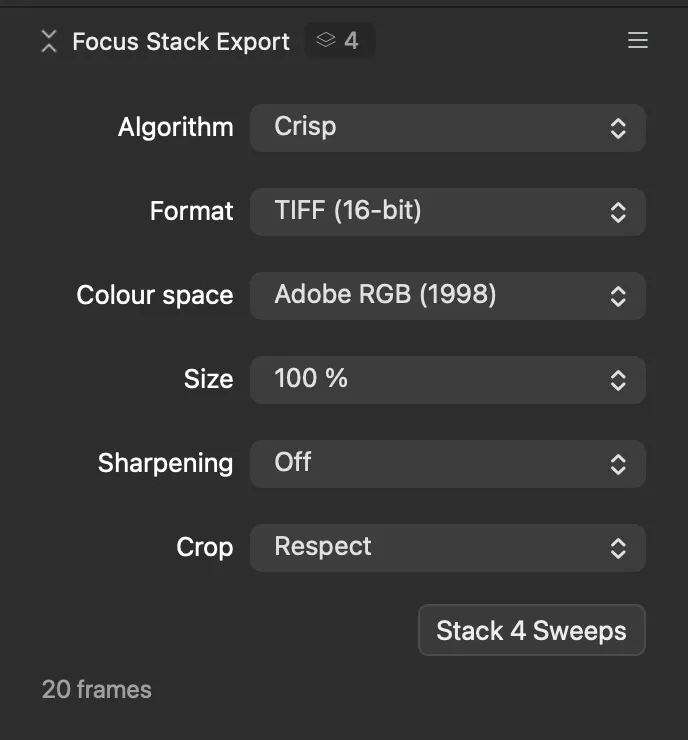
In Capture One, select images from one or more sweeps.
Choose the settings, or a preset from the ☰ menu.
Click Stack 1 Sweep (or Stack 2 Sweeps, and so on). DT Nexus reports how many sweeps were queued. Follow their progress in the Jobs panel.
Setting | Options | Default |
|---|---|---|
Algorithm | Crisp, Gentle, Smooth | Crisp |
Format | TIFF (16-bit), TIFF (8-bit), JPG, QuickProof JPG | TIFF (16-bit) |
Colour space | Adobe RGB (1998), ProPhoto RGB, sRGB | Adobe RGB (1998) |
Size | 100 %, 50 %, 25 % | 100 % |
Sharpening | Off, Low, Medium, High | Off |
Crop | Respect, Ignore | Respect |
- QuickProof JPG is a fast preview made from Capture One's QuickProof, below full size.
- Crop sets whether the crop applied in Capture One is used. Straightening and orientation must match in either mode.
The factory presets are "QuickProof preview", "TIFF · Adobe RGB", "TIFF · ProPhoto RGB", "TIFF 8-bit · Adobe RGB", and "JPG · Adobe RGB". Save your own with Save Preset... in the ☰ menu.
The stacked image is saved in the capture folder, beside the sweep folder, and is named after the sweep and the preset, for example FocusStack_0001_TIFF_Adobe_RGB.
Images from other camera makes are skipped, and DT Nexus reports how many were skipped.